Wednesday, November 28, 2012

Repairing Cracked Drywall

One of our never ending projects is painting the interior of our house. However, before we were able to get to putting new colors on our walls, we had to repair the existing problems. The house has several non-structural cracks in the drywall in addition to about a thousand nail/screw holes.

The first step was to google the problem. Frankly I don't know how we would begin to do these home repairs without the interwebz! I did my research, made my shopping list, bought the stuff I needed, and dove in. I decided to start with a crack in the master bedroom because it was one that wasn't in any direct line of sight and if it all went horribly I wouldn't be ruining anything. Here's the process I went with!

Cracked wall. Also you can see how gross the walls are and why they so badly needed to be painted.
Step 1: Take a razor blade/exacto knife and cut out the old repair job, and dig into the crack creating a V-shaped crack that is mostly clear of debris. Our lovely previous owners did not repair this crack correctly so the majority of our time on this project was removing old repair work and cleaning out the crack.
Demo always comes before Reno
The infamous previous owners did not patch it correctly. 
Nice trench waiting to be filled and taped. 
 Step 2: Using drywall compound, smear/fill the crack with your fingers. This step is really similar to filling nail holes with putty, except you use drywall compound and you have a long crack to fill instead of a round hole.

Fill it up! 
Filled, no tape yet
"Honey I'm so glad we bought a fixer!"
Step 3: Smear a thin layer of drywall compound over the crack using a 6" taping knife.


Step 4: Place fancy drywall tape over the crack. Be sure to cut your pieces small enough to be able to follow the shape of the crack but not so small that you end up having a ton of seams. Smooth out the tape using your fingers. Wipe your fingers on your work jeans because it's fun to make them look messy.
Placing tape

Step 5: Smear another layer of drywall compound over the tape and feather out slightly (again using the 6" taping knife.) Let dry overnight.

Tape with compound on top (left) and tape with compound only underneath (right)
Step 6: Spread a final thin layer of drywall compound using a 12" taping knife and feathering out the sides. Let dry overnight.

Step 7: Sand using fine sandpaper, wipe clean.
All ready for texture!
Of course... I didn't take good pics of steps 8-10. You get what you get.

Step 8 (optional): Spray texturizer on the crack and wipe it with a special blade so it at least kind of matches the rest of the wall.

(can you tell this is a different room?)

Step 9: Prime, paint, and hope it the crack doesn't reopen!

Step 10: Repeat process at least ten more times because you bought a fixer.

Before
After

Wednesday, September 19, 2012

New Sewer

No pictures for this quick update, because I was too shy to go out and take pictures of the construction workers and their crazy machines. However, I am pleased to report that our sewer line is now brand new! It was crap ton of money for an "invisible" repair but it was one of the biggest structural things wrong with our house. They were able to do a trenchless line for the most part but they had to dig down in several places because our line wasn't a straight shot to the street. They also dug into the asphalt and repaved the middle of the road. I bet our neighbors are glad that is finished with. Now we don't have to worry about any crappy problems down the road. (You didn't think you were going to get away without a couple of crappy puns did you?)

Friday, September 14, 2012

Summer Camp

Last weekend I got to do the most awesome thing ever: go to summer camp with three of my good friends! The four of us have been friends pretty much since the first day of PreSchool Drills (aka band camp) when we were all clarinet rookies together. The last eleven years have thrown a lot of life at us and when we realized we had the chance to go to camp together, we didn't hesitate. (Unfortunately this was the same weekend as the LSU game so several of our other girlfriends couldn't make it.)

Jenn, Me, Annie, Emily at the end of camp

Camp Sweyolakan is the Campfire summer camp where Annie went as a camper and later worked as staff. Emily is a Roganunda alum (sadly the camp has been sold and is no longer a Campfire camp) and Jenn hails from Camp Sealth. Though I had camp experience it was definitely nothing like a true summer camp so this was a first for me! We went to camp's Women's Retreat, which was about 80 women reliving the good old days of camp.

Dust Devil at a rest stop in Eastern Washington
Camp is in Coeur d'Alene, Idaho. We road tripped across the state and made it to camp in the early evening. Our 7.5 hour drive flew by since we pretty much didn't stop talking the entire time.

Carbon Copy loading up campers
We got to take a boat from the parking area to camp. The lake was a lot bigger than I imagined and it was gorgeous!

Emily & Me on the way to camp
The dining hall was very iconic. It fits everything you ever imagined summer camp to be. Since I spent some of my summer camps (cough band camps) staying in college dorms, this was especially novel!

Dining Hall Porch
We all enjoyed a weekend of not cooking, doing dishes, or worrying about chores! We also especially enjoyed extra desserts and camp hot chocolate.

Dining Hall 
The first night of camp ended with a campfire, s'mores, and traditional campfire songs. I am now officially on a hunt for lyrics and recordings of camp songs so that I can learn them all.

After starting out in another unit (for all of five minutes) we switched over to staying in Connemara. All of the shelters in camp were open air but these let us stay on the second floor in a nearly empty unit. Awesome does not even begin to describe the shelters. 

Our cabin, Kerry

Cabin roof
Not pictured: the giant tin of candy that we ate while hanging out on our bunks. We may have forgot we were grown ups for a bit.

Emily's bunk
 It really was open air!

Jenn's bunk
The views from our cabin were pretty spectacular. We stole mattresses from empty bunks so we could sleep a bit more comfortably.

Home Sweet Home for the weekend
 Have I mentioned the views? It was so wonderful to spend a weekend in the woods!


On Saturday we conquered the ropes course. As a camp newbie, I was also the only one who had never done a high ropes course. When I say "high" I mean it. I think the course was about 50 feet off the ground!

Me climbing up the rope tube
I'm feeling pretty confident here 
In this picture (above) I haven't realized yet that I won't be able to reach the clip ins and I will have to stand with one leg on a tiny 3 inch peg while I reach precariously out to clip into a wire that is six inches past my reach. I actually came to the conclusion that it just wasn't possible for me to reach but the girls reminded me that if I wanted to do the zipline I had to complete the course. So after some pretty intense strategizing I managed to get clipped in to the next challenge!

Me on the second challenge
It was REALLY high. After I finished the second challenge (the first was the rope tube) the facilitator asked me if it was fun and I very emphatically told him NO. Don't worry, I later changed my mind.

Not zoomed in
After the that challenge I was met with yet another round of trying to figure out how to unclip and clip in to the next challenge. Again I announced that it simply couldn't be done, and again I was reminded that I had to finish the course if I wanted to do the zipline. So I dug deeper and thought smarter and figured out how to reach the dang wire to clip in.

Me waltzing across the steps
Interestingly enough I didn't find the actual challenges all that hard. Probably if I didn't spend a ton of time and effort trying to clip in to them I would have over thought them and freaked out a bit.

Here I am trying to reach the clips. 
Finally, I only had one challenge left before the zipline. Again, I could not figure out how to get those darn clips transfered! The girls (who may know me better than myself at this point in life) told me to just sit there for 10 or 15 minutes while I tried to figure it out. While resting, I was talking with a few more people on the ground and one of them was two inches shorter than me. She helped me strategize reaching the clips and I was really motivated by the fact that someone shorter than me managed to do it.  (read: my competitive edge kicked in)


Video (top) is of me finishing the last challenge. Video (below) is of me finally doing the zipline, which was a bucket list item for me!


After I finished the course the other three girls took their turns.

Jenn taking the leap of faith

Annie on the Tarzan ropes

Emily walking across a log (that happens to be really high in the air!)

Emily way up high
Unfortunately the video I took of Emily's zip line didn't turn out. But she took that thing upside down... as in on her way down she swung her feet up in the air and went flying head down! Crazy camper!

The ropes course was really, really challenging for me. I can honestly say it was a harder mental challenge than running a half marathon. When I ran my half, there was not a single moment that I thought it was impossible. However, on the ropes course, three different times I faced challenges that I genuinely thought I physically could not do. But I did them anyways!! And it was extra special to have such good friends there supporting me and conquering the ropes course for themselves too.

Emily, Jenn, Annie
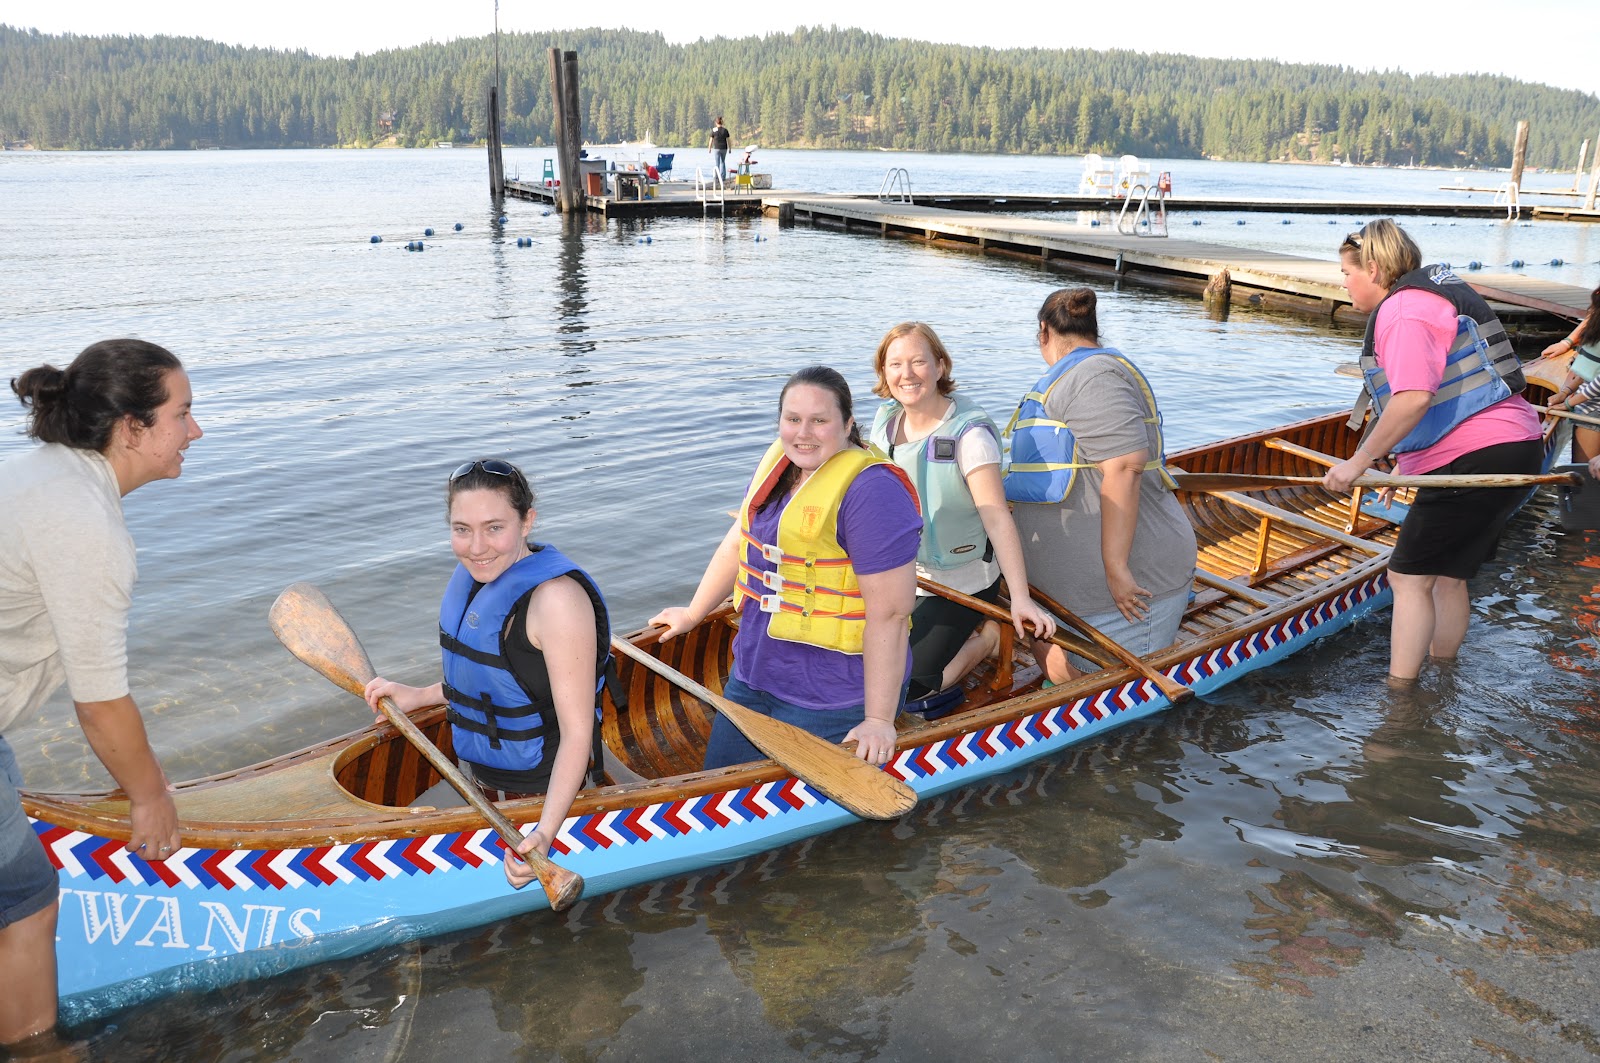
After the excitement of the ropes course, we did some light hiking and explored the rest of camp. Then, while waiting for our turn in the war canoe, the camp director announced that we were going to get to put one of the refurbished canoes into the water for her maiden voyage!!! All we had to do was help carry her down the hill.


We ended our weekend with another campfire, a relaxed morning, and the long drive back to Seattle (which was of course filled with nonstop chatter.)

Summer Camp for grown ups was really, really fantastic. We can't wait to go again next year, though we might try out a different camp or possibly family camp so the boys can come too. Who's coming with us? 

Thursday, August 30, 2012

Toilets: Master Bath

We suspected the master bath toilet just needed to either have the bolts tightened or maybe have it reseated before we moved in. After we got there though we realized that though it was a newer toilet, it was a tiny round bowl toilet that was really just not for us. In addition, Mark took one look at the bolts and said "this is coming out!" While the ceramic parts of the toilet were fine, the metal bolts were totally rusty and corroded and awful. And it rocked a lot, which is not good.

So, using our 10% off coupon at Lowes, we added a new toilet to our already giant shopping cart. This happened to be the same trip that we bought a washer & dryer, refrigerator, a new living room rug, and a hundred other things we "needed". We chose a chair height, oval bowl that fits into the space of a round bowl by utilizing a smaller tank. The only negative was that it didn't have the low flow flusher, but we can always add that later and it already is a pretty low flow toilet.

We waited until our resident expert Annie was in town and then Mark and Annie tackled the project. This is my retelling based on their notes.

First they removed the old toilet. This included cleaning up the flange, removing the gross remnants of the old wax ring, and plugging up the sewer pipe with a rag.

Next, the new toilet had to come out of the box. Annie wisely suggested doing a dry fit with the new toilet and they traced with pencil the landing spot for it. Then the toilet came back up to have the new wax ring affixed to it. In order to make the wax ring soft enough to stick, it needed to have a blow dryer blow hot air on it for a bit.

Finally, they set the new toilet (with wax ring) back into place and bolted it in. Tada! Except... it still wiggled. A lot.

Mark testing out the toilet fit with Sadie's supervision
So Annie and Mark decided to pull the new toilet back up to investigate. And when they did so, the entire flange from the sewer pipe came up with the toilet! At this point, I came into the room and discovered both Annie and Mark laughing maniacally. Mark just says to me "This project just got a whole lot bigger!"

For the next couple of hours, Annie and Mark discussed, debated, researched, and watched various videos on the internet. They finally decide what part they need. Go to ACE hardware, buy the part, come home, and it doesn't fit. So they hit the internet again.

Finally we go to OSH to get the correct parts, which turned out to be a replacement toilet flange that tightens to fit the sewer pipe.

Old flange with new flange installed
Then, after watching very useful this old house videos, they install the parts.

BUT WAIT! Before they can install the parts correctly, Mark has to chisel out some of the old tile mortar that for some stupid reason a previous owner had put around the sewer pipe. In addition, he had to sawzall some of the subfloor. It should be mentioned that Mark did the chiseling with a flat head screw driver and a hammer.
"Oh honey I'm so glad we bought a fixer!!"
Finally, Mark prevailed and he and Annie got the new part installed, refit the toilet and discovered... that it still rocked back and forth. A lot.

Not to worry though! The determined team figured out that the floor itself was uneven with a bit of a rise directly under the toilet. They hit the internet and discovered they could use plastic shims to even out the toilet.

New flange with outline for toilet and shims in place
After another run to OSH to acquire the plastic shims and a new wax ring, cleaning off the old wax ring goop, they finally installed the toilet, shimmed it, tightened the bolts, and finally the toilet was in useable working order and did NOT rock!

New low flow, clean, stable, non-leaky and non-rocky toilet!! 
Whew! All I can say is... I'm glad I stayed well out of the way of this project. And the one job I was given (taking pictures) I didn't do all that well in since the pictures are off color and I missed many of the good action shots. I was too busy fixing other things! But the bottom line (haha bottom) is that now we have two fully functional toilets in the house. And that's something to post about!


Tuesday, August 28, 2012

Toilets: Green Bath


Before we moved in we knew that our toilet situation needed help. As my dad so gently put it, we desperately needed a better place to put all our crap. We guessed that our master bath toilet needed to be re-seated and the family bath (aka green bath) toilet needed some new inner parts. Here's how it the green bath toilet got fixed and updated.
As you can see, "Green Bath" is an appropriate name
The problem was that the toilet would continually fill until the tank overflowed. Then it would keep overflowing. There also was a small leak somewhere that we couldn't identify. Finally, the whole toilet seems to be original to the house, meaning it was a far cry from low flow.

We bought an all in one flapper kit from our favorite hardware store, OSH (Orchard Supply Hardware.) We also bought a 1flush/2flush retro grade kit. Mark replaced the flapper, float, chain, valvue and pretty much every working part inside the tank. After a few adjustments, we had a working non-overflowing toilet!

Then he installed the low flow flusher, which is a pretty cool thing. It fit right into our old toilet (I feel certain Mark made an effort to buy one that would fit) and you calibrate it for how big of a flush you want for your big and little flushes. Now we can flush without wondering if we're losing 5 gallons of water per flush!
Modern plumbing meets original charm!
However, after replacing all of those parts, there was still a small leak. Mark turned off the water to the toilet, took the hoses that attached to the wall to OSH, got some local friendly advice, and replaced them. Voila! The green bath now has a non-overflowing, water saving, non-leaky toilet. Winner!